tutorial

Headwrap Tutorial

Now that the weather is getting chilly here in Michigan, my handknits have been on display daily.  One of my go-to's is my Anthropologie Inspired Plaited Headwrap.  And when she's not trying to pull it off of her little head, Elise even gets some use out of it!


Recently I was contacted by Christine of iKnits about featuring my slippers on her youtube channel.   She did such a wonderful job that when she asked for suggestions for other videos I told her that if she wanted to do a video tutorial of how to assemble my plaited headwrap I would be much obliged. 


Not only did Christine put together a tutorial on assembling the headwrap, but she went above and beyond, explaining each step of the pattern- from casting on, magic loop, and binding off. So, if you are a new knitter looking for a simple project, this is perfect for you.  Thanks, Christine!

ps...you can find the link to this video here, and for future reference, I have added it to my "tutorials" tab above.

Pom Tutorial


In keeping up with the week of International Craft Day, today we will talk about the poms at my baby shower.  My mom had a package of store bought poms which inspired me and my sisters to make a few more.  Now that we have a little girl, I may reuse these poms above her crib in lieu of a traditional nursery mobile.


What you'll need:
10-12 sheets of tissue paper
scissors
stapler
string for hanging


Step 1:  lay all your sheets of tissue paper out in front of you


Step 2:  Fan fold the sheets (each fold should be about 1.5")


completed fan-folded tissue paper


Step 3:  using scissors, round the edges (I have also seen the edges cut to a point as a different option)


rounded edges


Step 4:  Staple right through the center of the folded tissue paper.  You are going through many layers, it will be tought to get the staple all the way through.  I put the stapler on the table and slammed it down as hard as I could.


Step 5:  fold down each layer, one by one


Step 6:  This should actually be step 5, but I forgot and did it as I went.  Tie a string around center of pom.  This way you will be able to hang it once it is all fanned out.


Step 7:  Hang: Ta-da!

Frosted Glow Tutorial

This was the tutorial I posted last month on luvinthemommyhood for the big comfy knits vs. cozy sews roundup.  Since I never actually posted the pattern here, I figured there was no better time than now.  This is how I will wrap up the past two weeks of tutorials. Hope you've enjoyed International Craft Day as much as I have!

Comfy Knits vs. Cozy Sews.  Nothing fires up designers and crafters more than a good old fashioned blog 'battle royale.'  I can't tell you how excited I am to be here today.  As a knitter, summer is my training season- I've spent months preparing for my time in the ring.

Of course, as a knitter, I already feel like we have the 'one up.'  You see, knitting allows us to create our own fabric, taking one dimensional natural fibers and creating two or three dimensional garments.  And with just one simple knitted garment, an entire ensemble can so easily be endowed with a touch of luxury.

Let's jump right in, shall we?


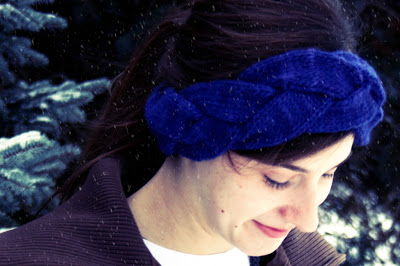
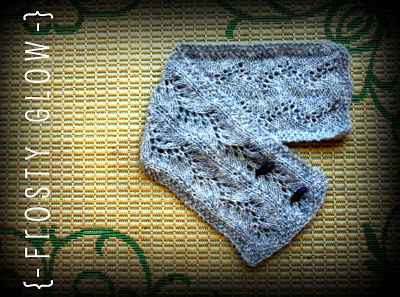
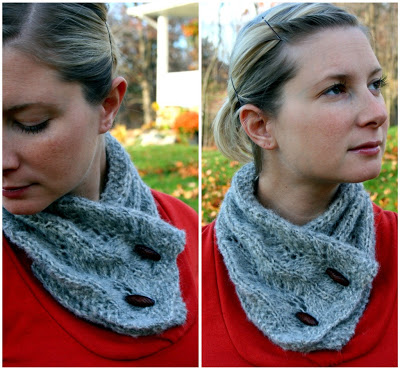
Today I have prepared a pattern that is perfect for the colder weather lurking around the corner.  Even on a drab day, this 'Frosted Glow Cowl' will be sure to add that touch of luxury (not to mention warmth) to your outfit. 
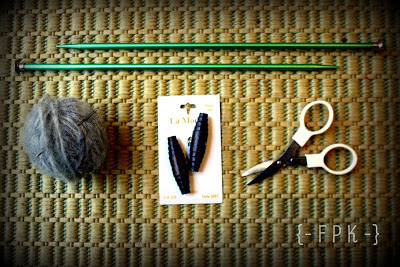


What You'll Need:
 1 skein Rowan Alpaca Cotton
 Size 8 US needles 
 Buttons
 Needle and Thread
 Scissors


Gauge:  4" = 16 sts

Abbreviations:
K: Knit
P: Purl
k2tog: knit two together
yo: yarn over
ssk: slip slip knit
rep: Repeat
RS: Right side
WS: Wrong Side


Cast on 27 stitches

Rows 1-6:  Work in moss stitch pattern (*K1, P1, rep from * to end)

Row 7(RS):  K1, P1, K2, *k2tog, k4, yo, k1, yo, ssk, k1: rep from * to last three stitches, K1, P1, K1

Row 8 and every following WS row: K1, Pl, K1, purl to last 3 sitcthes; K1, P1, K1

Row 9: K1, P1, K2, *k2tog, k3, (yo, k1) twice, ssk, k1;  rep from * to last three stitches, K1, P1, K1

Row 11:  K1, P1, K2, * k2tog, k2, yo, k1, yo, k2, ssk, k1; rep from * to last three stitches, K1, P1, K1

Row 13: K1, P1, K2, *k2tog, (k1, yo) twice, k3, ssk, k1;  rep from * to last three stitches, K1, P1, K1

Row 15: K1, P1, K2, *k2tog, yo, k1, yo, k4, ssk, k1; rep from * to last three stitches, K1, P1, K1

Row 17: K1, P1, K2, *k2tog, (k1, yo) twice, k3, ssk, k1; rep from * to last three stitches, K1, P1, K1

Row 19:   K1, P1, K2, * k2tog, k2, yo, k1, yo, k2, ssk, k1; rep from * to last three stitches, K1, P1, K1

Row 21: K1, P1, K2, *k2tog, k3, (yo, k1) twice, ssk, k1; rep from * to last three stitches, K1, P1, K1

Row 22: K1, P1, K1, Purl to last three sts, K1, P1, K1

More of a chart person (me too!)?  This one's for you:


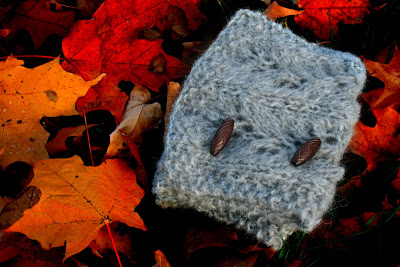
Repeat rows 7- 22 until scarflette measures 24". End how you started, with 6 moss stitch rows, and then bind off.

Add buttons, you can use the yarn overs within the pattern as buttonholes.

If you are on Ravelry and want to add this to your project page, just search the patterns for "Frosted Glow".
You can also take a look at my project page for this project done in a different yarn/gauge for more ideas.  

Magnetic Paper Dolls Tutorial


I figured I would kick off the ICD tutorial series with a project I've been wanting to make for quite some time.  I first saw this tutorial a year ago over at One Pearl Button and have been dying to make these for my nieces ever since.


Here's what you'll need:

  • Betsey McCall paper dolls printed from here.  When I clicked on the file, I had to zoom in in order for the page to be full size on the printed paper.  
  • Small metal box to store the dolls.  I picked up a couple gift card holders from Michael's (found right by the cash registers), but there were also some plain silver boxes similar in size in the back.  They were a bit deeper than these ones, so if you're really into cutting things out, you may want to go with that option :)
  • Adhesive magnetic paper.  I found the 1'x2' roll at Michaels.  The smaller sheets came from JoAnn's. 
  • Scissors


Step 1:  Cut out your dolls and outfits.  Since your set will be magnetic, you will not need the tabs.

Step 2:  Peel backing off adhesive magnetic sheet and arrange dolls and dresses.

Step 3:  Cut out your shapes.

Step 4:  Repeat.


Easy, peasy- no?

When you have the dolls and dresses you want, you can store them in your magnetic metal case.  Alli from One Pearl Button made this little label to put onto her little tin:


Find more info on how to download on her blog

Navajo Knitting

This past Saturday I spent a good portion of my day teaching a French Press Felted Slipper class at a local yarn shop.  Although teaching is still pretty new to me, I'm starting to get the order of the class down.  When you start the slippers, you start with the bottoms.  Because of this, I kick the class off with Navajo Knitting.

I first learned about Navajo Knitting when a fellow Raveler posted about it on the 'Hints and Tips' thread of the French Press Knits group on Ravelry.  This is also the first I heard of Lucy Neatby (isn't she amazing?!).  Anyway, this kind-hearted and brilliant Raveler posted a link to Lucy Neatby's Navajo Knitting video that can be found on youtube.  When doing the class this past weekend, it hit me that I have never shared this video here with my readers.

Well, it's about time I do:


Navajo Knitting comes from Navajo Plying.  Why is it so useful for the slippers?  It turns one strand of yarn into three.   This way you do not have to separate your two skeins of yarn into three.  Even if you aren't planning on making the slippers anytime soon, watch the video.  Lucy does a great job and you'll be impressed with the new skill you'll learn!